Monday, December 5, 2011

Mercury Glass or Poor Man's Silver

Mercury Glass


Mercury Glass is back in style and featured in catalogs like Pottery Barn and Wisteria, and popping up at my favorite chain boutique, Anthropologie. The glimmering silvery candle holders, lamps, and home accents look elegant paired with white for a dazzling winter glow. 

From the 1840's to the early 1930's, mercury glass was produced and offered to the public as a substitute for sterling silver. Called "poor man's silver," this double walled glass contained no mercury. A liquid silver was poured between the glass walls and sealed to prevent tarnish. Old mercury glass was often etched, providing even more twinkle. 

Today, antique mercury glass is somewhat hard to find, due to breakage, and so can be quite expensive. The new versions are affordable, even for those on a tight budget. 

But living in reduced circumstances, combined with the fact that I already own way too much in the way of decorating accents, accumulated over the years, I think I'll pass on the mercury glass. I will use my vintage silver plate instead, and allow silver to stand in for mercury glass. 


Even buying used silver plate is cheaper than the new mercury glass. Thrift stores usually offer lots of silver plate for less than $5.00 an item. Look for the tell-tale black smudges that indicate tarnished silver. Just take it home and polish it up. Vintage silver plate is the new poor man's mercury glass.

Monday, November 21, 2011

Vintage Wood Shoemakers' Lasts


Wood shoe mold or shoe last


Vintage shoe forms or shoemakers' lasts make attractive home accents. These wood shoe forms, once used in the production of footwear add an industrial yet organic feel to any design motif. 

Old shoe forms look great in an urban setting and are particularly suitable for a steampunk design style. Despite the seemingly quaint technology, the single last pictured to the right is dated 1959. Many of these shoemakers' molds bear dates, sizes, and the name of a manufacturer. 

Wood shoe lasts were made of a hardwood like maple to maintain shape through constant use. Chemical preservatives helped prevent swelling and shrinking of the wood. 

Shoe form
 Wood shoe lasts were made of a hardwood like maple to maintain shape through constant use. Chemical preservatives helped prevent swelling and shrinking of the wood.

The North East part of the United States was once a major manufacturing hub for footwear. As American production waned, many of these lasts became available in antique and salvage shops, as well as online sites, and can be quite inexpensive to buy.

Before the Industrial Revolution, shoes were commonly made on straight lasts and not intended to fit the right or left foot. Shoes made in this manner obtained a fit through wear. It was not until the mid 1800's that shoe mills commonly made footwear to fit the right or left foot. Today, most shoe lasts are made of plastic.

Wednesday, November 16, 2011

Make an Easy Landscape Quilt Pillow Cover


Some time ago, I became enamored with landscape quilts. I love landscape art in general and have attempted to paint a few landscapes myself. When I first heard of landscape quilts, I was intrigued. After searching the internet for examples, I was flummoxed. No way could I create something like that, or even understand the complicated skills needed to produce such work! The artistic talent, the sewing skills, and the patience were way beyond my humble capabilities.

So I decided to cheat. I made a pillow, covered on one side with the simplest landscape possible. At Joanne's I found several fabrics that would fit the bill, including one that looked like white birch bark. 

I made a simple scene - several birch tree trunks in front of a larger forest which I suggested by using a deep green batik as a background. A wavy blue batik became a water feature. A lake!

After washing, ironing, and starching the fabric, I cut the green batik background. Next, I cut a strip of the "water" and sewed them together.


Thinner strips made the birch trunks. I cut the fabric with the slight bark pattern into long strips. I did not cut them perfectly straight, opting for a more natural look.
The edges of the trunks were hemmed with an iron, then  stitched to the background.

Using black embroidery floss, I added some dark shadows to the trunks, as well as some thin, black branches. 

The leaves were embroidered in metallic gold to give the suggestion of leaves catching a glint of sunlight. 


Voila! I made my own little landscape quilt and can honestly say that I am quite pleased with the result. Of course, it doesn't hold a candle to the quilts made by expert artists, but it certainly was fun. Though this project was simple, it gave me a taste of the real thing, and an honest appreciation of and admiration for the people who create those totally fabulous landscape quilts. 

Tuesday, November 1, 2011

I Found My Dream House - Yes I Did


I found my Dream House, really I did. Not the idealized architecturally significant wonder home, or the cottage hidden behind hollyhocks and a white picket fence, but the place that I visited in several dreams. I haven't had that particular dream for some time, so the real one was as abandoned and decrepit as it would be if it was a barely remembered, deserted dream. 

Just like the one I dreamed about, it was an old farm house, two and a half stories, build close to a hill that rose up on the north side. In the dream, I was walking beside the outside walls, down the hill, through dry, sweet smelling weeds. And I can smell the water, wet rocks, and sun shining on grass. 

So, there was the real one, sans the green painted clapboard and brown trim. Paint was a distant memory here. Part of the house was built of logs and the lawn slanted gently  toward the water. A sycamore grew down by the clear, spring fed stream.


Like in the dream, crickets make way for me and silhouetted birds sing in the trees. I hear an oriole and a king fisher. 

A ruin stands nearby, an old kiln that looks like a place in a fairy tale. 

The white paneled door stands open. Do I enter?


Monday, October 24, 2011

Vintage Cocktail Trays


Vintage cocktail trays


The mid twentieth century was a great time for cocktail parties. Housewives had the time to make all those cute little hors d'oeuvres in what, for some, became like contests, featuring bread cut into fanciful shapes and topped with artistic designs made of cream cheese, canned shrimp, olives, and pimentos; all served on tiny, individual trays called cocktail trays.

There are still lots of these cocktail trays around. Flat, and stacked neatly, they did not take up a lot of room. You can often find them at thrift shops and yard sales at bargain prices, though I have seen a few at online shops that sell for a pretty penny. 

I think a modern cocktail party would be fun - everyone dressed up in vintage cocktail attire for a wink at sophistication.  Offer your guests handmade hors d'oeuvres, or use the little trays to serve sushi. 
The colorful plastic trays  pictured at the top of the page came from a larger set in a rainbow of colors.

Vintage cocktail trays


The attractive papier mache covered cocktail trays pictured above were made in Japan and have a tag on the bottom that says "alcohol proof."


 I'm not sure what they were thinking when they came out with these metal cocktail trays featuring silhouettes of people from Victorian times. Maybe they would work better at a tea party. 


Vintage cocktail trays are also nice to keep on a bureau for stray keys or change. They make lovely coasters or snack trays as well. When I was a little girl, we used the colored plastic trays for tea parties. That's probably why I no longer have the full set.

Dried Roses for a Vintage Floral Design


Dried roses mixed with dried hydrangeas


Roses dry out surprisingly well, and easily too! I discovered this when my husband dead-headed some rose bushes and tossed the spent flowers into an old iron pot set on the porch steps. It was a dry summer, and the roses, forgotten, dried beautifully. 

Another accidental incident of dried roses - at the home of a very busy lady, I  noticed that she had let a huge vase of yellow roses go dry. Totally dry. The stems were shot, but I snipped off the flowers, took them home, and arranged them in a shallow bowl. Without using silica gel, the roses retained their color, fading to a lovely vintage shade.

These roses were hung upside down in a dark dry area for a bit over a week. I loved the muted tones and the vintage look, that soft, buttery yellow. 

When drying roses, it is best to use buds, or flowers that have just begun to open. Roses in full flower will lose petals if dried. 
Dried roses


I think dried roses would look very pretty added to an herb wreath, or mixed in with some dried lavender, or even tucked into some evergreens in a Christmas wreath.

Tuesday, October 4, 2011

Christmas Sachets With Balsam Needles


There is nothing like the scent of balsam at Christmas. It seems like the iconic aroma of the holiday season. It's easy to make these cute sachets for gift giving or to add scent to your own home. The scent lasts for years.

I asked the local Christmas tree dealer if I could take a bag full of fallen balsam needles. Of course, he did not mind one bit. Here is how to make these simple holiday sachets:

First, you need to dry out the needles. Place a layer of balsam needles on a cookie sheet and set in an oven heated to 200 degrees F. Bake the needles for ten minutes, then turn off the heat. Allow the needles to remain in the warm over, turning occasionally to ensure even dryness. Let them sit in the oven overnight, or repeat the procedure until the needles are fully dry. The whole house will smell like Christmas!

Cut fabric scraps into small squares. I like to use material that has a vintage look. To add that aged look to newer fabric, steep the squares in a tea bath.

Sew three sides of the fabric squares. Turn so the rough seam edges are inside the fabric packet, like you would if you were making a pillow. Stuff with the dried balsam needles. Make sure the needles are totally dry. 

Neatly hand sew the open edge closed. You can add a ribbon at one end for hanging.


Wednesday, September 21, 2011

Vary the Style of Hyrangeas With Different Containers


Hydrangeas provide an instant floral arrangement. The large clusters of blue, pink, or white blooms need no greenery, focal point, or filler, offering a one stop floral design and a simple, though luxurious bouquet.

Hydrangeas dry well for lovely late summer or fall arrangements. Allow the blooms to remain on the shrub until they begin to lose their color in late summer, then merely place them in a vase without water.  The dried hydrangeas pictured below were once deep blue but have faded to a soft green and greenish blue with a tinge of pink for a muted, vintage look.

No matter what your own personal style or decorating theme, hydrangeas will compliment any look and add that finishing touch that only real flowers can do. Below, check out the same bunch of dried hydrangeas in various containers, illustrating how to set a style with the same flowers using different vases, tubs or pots.


                                   Traditional

Hydrangeas displayed in a bowl as shown above make a simple yet elegant statement. When placing flowers on a dining table, make sure they are low enough to allow eye contact. You don't want to have to lean over to see the person sitting opposite.


                                          Formal

The long stemmed hydrangeas look marvelous in a tall glass vase where they grace the entry hall. A large space demands a sizable arrangement.


                                        Vintage 

Arranged in an antique blue and white spongeware pitcher, the soft hues of dried hydrangeas take on an old fashioned charm.


                                       Rustic

These painted metal floral tubs, once used on a European flower cart make for a dramatic yet home-spun appeal.


                                     Cottage Style

The clean white tea pot sets off the hydrangeas for a cottage look that is both simple and charming. The small arrangement would look nice on a table or for a tea party decoration.

Wednesday, July 27, 2011

Repurpose Vintage Silver for a Polished Look


Vintage silver plate utensils, trays, sugar bowls, creamers, and serving dishes can make a stylish impact for your table or anywhere around the house. Antique silver offers a genteel ambiance and adds panache to any home decor.

You can find lots of old silver plate dishware at thrift stores. I always see attractive items at my local Good Will Store at at other thrift stores in my area. Recognize silver plate by its tarnish which can turn a beautiful piece totally black.

Silver plate does wear off and some pieces will never regain their original shine even after a good rubbing with silver polish. In general, tarnish does not appear as circular spots. Those dark spots may be there for good. But even a damaged piece can look good. Just turn the bad spot toward the wall. Or think of those "age spots" as character.


Things to do With Vintage Silver


Fill a serving dish with pine cones, antique handkerchiefs, or sachets. In the bathroom, you can fill a silver dish with handmade soap. Silver plate can be very inexpensive. Use it to hold handmade soap, tea bags, candy or other items to give an elegant look to a gift.


Use a silver creamer or sugar bowl to hold flowers. Silver looks lovely paired with blue, white, or pink flowers and brings out the silver in artemisia and other gray or silvery foliage.


Use a silver cup or creamer to hold and display eating utensils at a party. A tall cup will add a new level to the table and make the forks or spoons easy to reach. (This cup could use a polish. But slightly tarnished silver can create a funky or rustic look)


Use a silver cup, creamer, or sugar bowl to hold tapered candles. Just soak a piece of Oasis floral foam, then place in the bottom of the container. Shove the candle into the foam. You can fill in the edges with leaves or flowers. Cut short pieces of evergreens at Christmas and insert into the foam. Add a bit of water to keep the green material fresh.

Once you start using old silver plate for decorating, you will think of many more uses. Why hide your grandmother's favorite silver plate in the cupboard when you can put it on display?


Tuesday, July 26, 2011

Set the Tone With Vintage Flatware on the Cheap

Vintage Flatware
Who can resist the genteel allure of vintage flatware? Older designs provide an interesting look to a table setting and the antique knives and forks have a comfortable weight not always found in cheap modern stainless steel.

Not long ago, Anthropologie offered a collection of mismatched sets of old flatware, randomly selected so that no two sets are alike. Mismatched flatware adds a unique touch that I prefer to a full new set. And while Anthro offered their Rediscovered Flatware for $36.00 a place setting, it can be done for less.

With a bit of work - if you call shopping work - you can create your own original flatware collection. Comb flea markets, garage sales, and thrift shops like Good Will - a hit or miss proposition that can be a lot of fun and ultimately rewarding. It's like a treasure hunt. Silver plate also shows up a lot on ebay and etsy. It's not quite as cheap as if it's in the bin at the thrift shop, but you can find very attractive older pieces for about $3.00 each.

I found one piece of silver plate flatware that I researched and dated to the late 1800's. It cost me one dollar. I also found defunct restaurant silver plate flatware and some cute pieces from a country club that depicted crossed golf clubs.

While hunting through bins or plastic bags, look for blackened flatware. Stainless steel will look its natural color but silver tarnishes, turning black. It may look awful, but under all that tarnish, you can find beautiful silver plate. Chances are, you won't find sterling silver at the Good Will. But you never know!

Just bring out the shine with a little silver polish.

My flatware finds have cost as little as 10 cents each, on up to $1.00 - a real bargain for something that is sorta fabulous.

Monday, July 25, 2011

Create Cheap Crate and Barrel Style Wood Furniture


Getting tired of a piece of furniture is no reason to get rid of it or incur the expense of buying something new (or even used). There are easy, inexpensive ways to update wood hutches, tables, and chairs that can totally change the personality of the piece. My fussy old hutch (as pictured on the right) needed a new look and I really love the look of black painted furniture at Crate and Barrel, particularly the Cornerstone series.

My old (1960's) hutch belonged to my mother. In the faux finishing days, my sister had painted it in a tortoise shell design. It was quite attractive as my sister w
as a professional and knew what she was doing.

But the faux finish was too much and detracted from the dishes that I like to display on the shelves. Stripping the furniture seemed like too much work and mess; and I was not too sure about the maple wood. A paint job seemed the best way to go.

For the cost of a quart of paint, a few pieces of sandpaper, paint brushes, and a can of spray paint, I now have a whole new look and am very pleased with the results.


Remove doors and hardware


How to Create the Crate and Barrel Look

1) Remove all hardware, doors, and drawers before you begin

2) Sand furniture with fine grain 180 grit sandpaper. Heavy grit sand paper can spoil the look of the wood by leaving lines.


3) Lay a base coat of flat or eggshell dark paint. I had some flat brown paint, so I just used that.

4) Paint furniture black. I used Martha Stewart's Francesca black eggshell. I used cheap boar's bristle paint brushes, the ones with the plain wooden handles at Home dePot. I also used a comb occasionally on the brush to remove loose bristles. A painting sponge would work well too.

You want the paint to go on smoothly in thin coats, as any material embedded in the paint will detract from the finish. Make sure you paint in a well lit area so you can see properly.

Thin coats prevent drip marks and create a nice, even coat.


5) Lightly sand between coats.

6) 2 - 3 coats work best


Trim the Edges

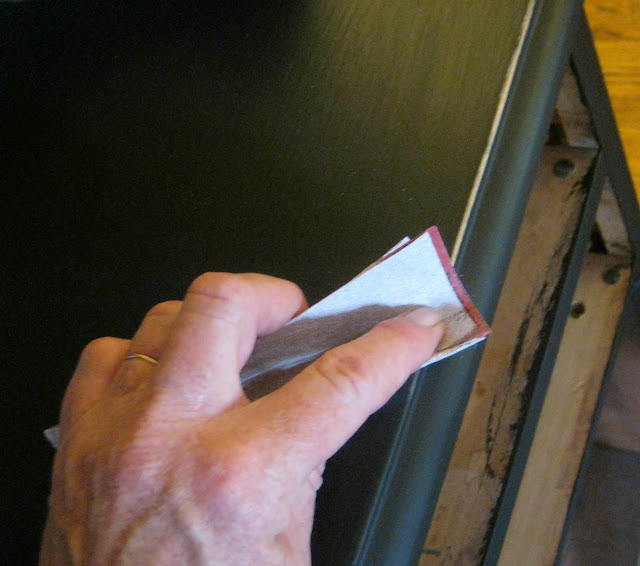
Sand the edges to create interest and break up the flat look of plain black.

With a piece of folded sandpaper, sand along the edges of the furniture until you remove all the black paint. Your lines don't have to be perfectly even.


Decide where you want to remove the paint then occasionally stand back to see how it is going. Sometimes less is more.

Hardware

The handles, and hinges were a bit too funky, so I took the rust off. To remove rust, immerse hardware in 1 Cup of white vinegar, 1 teaspoon salt, one tablespoon of lemon juice, and 1 tablespoon of hot sauce. Soak overnight.

I spray painted the hardware with Rustoleum Metallic Antique Brass